The following guide features excerpts from our expert webinar series, Slide Savvy with Fernando. In this series, Fernando Chang, IMG, a pathologist assistant renowned for his expertise in frozen section analysis, addresses some common issues with slide preparation and introduces proven techniques for freezing, handling, sectioning and staining that will empower you to create high quality frozen slides that help save lives.
In the biopsy process, staining refers to using special dyes to add color to a tissue sample mounted on a slide. Slide staining enhances visibility of tissue structures and aids pathologists in diagnosis. In organ evaluation, it plays an even more crucial role, influencing critical transplant decisions.
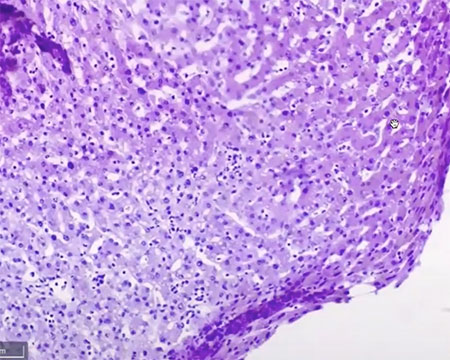
When there are inconsistencies in the slide staining process – such as overstaining and understaining – slide quality is compromised, making interpretation more difficult and potentially delaying lifesaving choices.
In this guide, CompuMed’s lead pathologist assistant, Fernando Chang, IMG, shares key insights, tools and techniques to ensure your team stains with accuracy and consistency, time after time.
Understanding the Staining Process and Its Challenges
The staining process involves dipping frozen section slides in various solutions at specific depths and for precise amounts of time, either manually or using automatic equipment. The goal? To produce clear, reliable slides that allow pathologists to accurately evaluate donor organ tissue.
Common staining issues include:
- Overstaining: The tissue absorbs too much stain, appearing overly dark or distorted.
- Understaining: The tissue absorbs too little stain, making details harder to see clearly.
Preventing these issues starts with understanding their causes and making any necessary adjustments to your process.
Overstaining: What It Is and How to Prevent It
Preventing overstaining begins with standardizing your process. Consider using an automatic slide stainer instead of manual equipment. When slides are loaded into an automatic system, staining solutions are automatically applied to the slide in the correct order and for a specific amount of time.
However, an automatic stainer won’t prevent overstaining if your tissue sample is too thick, as thick sections naturally absorb more dye. Preserve ideal tissue thickness by:
- Checking for proper cryostat settings. Ensure your cryostat is set to cut sections at 5 microns, the optimal thickness for most donor liver and kidney biopsy evaluations. Establish a routine for regularly checking the cryostat’s settings, especially after shift changes or when processing different types of tissues.
“There are times when thicker samples are necessary,” says Fernando. “But when a new shift is coming in, the cryostat needs to be reset to cut at the proper thickness which, in this case, is 5 microns.”
- Monitoring tissue temperature. Tissue that is too cold (-12°C to -15°C) tends to result in thicker sections even when cut at 5 microns. To maintain the right temperature:
- Use tools such as a temperature gun to confirm the block is between -17°C to -18°C.
- Check the OCT compound to make sure it is solid white in color before sectioning.
- Listen for clues. “If the tissue sounds crunchy when its being cut, you’ll know it’s too cold,” says Fernando.
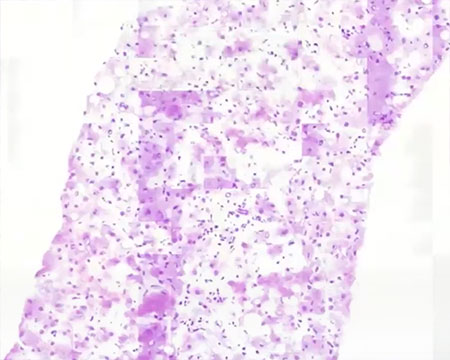
Understaining: What It Is and How to Prevent It
On the other end of the spectrum, your slides can suffer from understaining, resulting in slides that appear too faint or unevenly colored. Prevent understaining by:
- Maintaining and filtering staining solutions. With time and use, solutions can become diluted or contaminated with tissue debris. A film can also form if a solution is left to sit over a weekend or extended period. Regularly filter and replace solutions to maintain staining quality.
- Preventing evaporation. Alcohol-based solutions evaporate if not properly sealed. Keep alcohol containers covered when not in use and monitor solution levels daily.
“A simple lab chart documenting when solutions are changed can help prevent understaining,” Fernando suggests. “Tracking this helps ensure consistent staining quality.”
One More Key to Consistency… Observe and Adjust
Even with the right protocols in place, visual inspections are essential during the staining process. Train lab personnel to spot early signs of staining issues.
“Properly trained staff will notice changes in staining intensity,” says Fernando. “Understanding how factors like tissue temperature and solution maintenance affect slide quality allows for quick and effective fixes.”
For OPOs, producing high-quality, consistent slides is more than a technical process – it directly influences transplant outcomes. Clear, well-stained slides enable faster, more confident decision-making, reducing delays and helping to maximize the number of lives saved.
A note on virtual staining
This guide focuses on more traditional staining methods and does not cover AI-driven virtual staining of digitally scanned slides. While promising, virtual staining still faces technical and regulatory challenges. We’ll continue to monitor its development and potential impact on pathology.
Additional Frozen Section Resources
- Did you find this helpful? Check out Fernando’s blogs on OPO lab set-up and preferred tools and equipment, including automatic slide staining equipment.
- Interested in consultations and feedback? CompuMed’s lead pathologist assistant is available to provide clients with consultations, training and feedback on samples. Contact us to learn more.
- Ready to request a read? Our expert sub-specialist network provides some of the most comprehensive, donor-focused biopsy reports in the industry. Take a closer look at what’s included in our reports and how they give transplant centers the confidence to say yes to an organ faster.